
Creating an Extension in Business Central using the Designer
- Jan 6, 2019
- 3 min read
You can use the drag and drop functions in Design Mode to create many extensions without coding. Design Mode is only available in the Sandbox. Once you have finished your design changes, you download the code that Microsoft created behind the scenes. Then create a new folder for Visual Studio Code. Then extract the contents of the downloaded zip file to that folder. Then create an .app file (a package – one and the same). Go to the live instance of Business Central and Upload that .app file. You may run into small errors, which are easily handled, by following instructions in the error window. Once successfully installed, all users in the live instance will be able to take advantage of those new changes. The screen shots below will take you step-by-step to a successful completion.
Make three changes to the Cash Receipt Journal: 1) Hide the AMOUNT column, because it is redundant to the AMOUNT($), when not using multi-currency.
2) Add a COMMENT field next to Description.
3) Freeze the ACCOUNT NO. field when scrolling to the right.

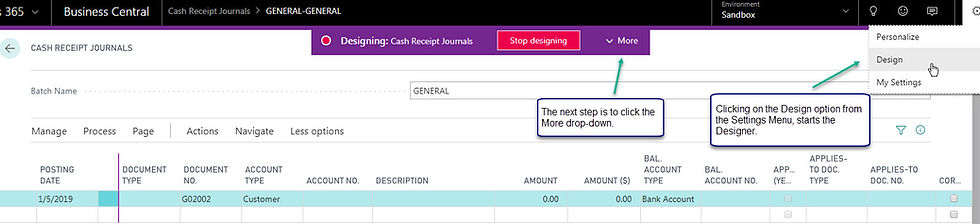
Opening up the Settings tool (gear-looking icon at the top right), shows the Design mode option. Once clicked, then choose More from the drop-down at the center-top of the screen.
Hover the mouse over the AMOUNT field to hide it (Remove). You can always undo any of these changes later on, by Uninstalling the Extension or Modifying it.

Set the Freeze Pane on the ACCOUNT NO. field, so it stays in sight when scrolling to the right.

Now drag the COMMENT field from the Fields List on the right to the position you require (next to the DESCRIPTION field).

Stop designing when finished.

Enter the Extension Name, the Publisher, check the Download Code box, and Save to your local drive.

Okay to Save the code.

The new extension for the Cash Receipts Journal is now installed in the Sandbox.

Check the Sandbox to see if the extension was really installed and if the changes turned out the way you planned.

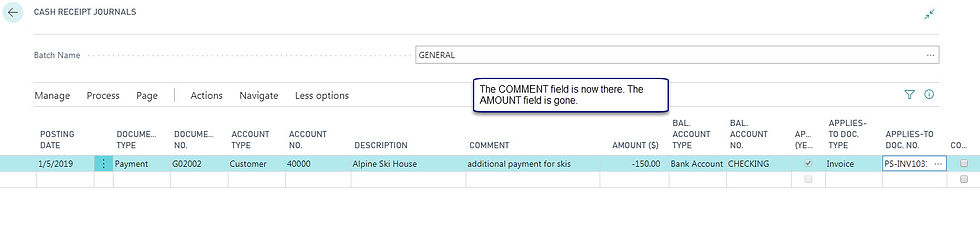
The COMMENT field is there. The AMOUNT field is gone.
When Scrolling to the right, the ACCOUNT NO. field freezes, so you don’t lose which customer the journal is for.

Now we are ready to create a package file (.app) from the downloaded code. A few screenshots back we Saved the Design into a .zip file in our default downloads folder. Please ignore that file. Download the code again from the Extensions page. Click the Download Source option from the Manage Extensions menu - to recreate that same zip file (this one works).

The zip file you downloaded is here. The contents will be loaded into the Visual Studio Code window to create the package.

I created a sub-folder below my AL code folder. I named it CashReceiptMods1. Then I extracted the contents of the .zip file previously downloaded from the Extensions->Manage menu.

After opening the newly created folder in Visual Studio Code, I get a warning message that the Symbols files have not been downloaded. These are Microsoft .app files that are necessary to create a new package. So I clicked the button to Download Symbols.

The Symbol files have been successfully downloaded.

Use Ctrl+Shift+P to get a list of commands. Then choose AL: Package.

The Package file was successfully created.

Go to the Live Tenant for Business Central and Upload the newly created extension.

You will be asked to Search for the newly created .app file on your hard drive. Go to the sub-folder that was just created under the AL code folder.

Deploy the extension.

It may take a few minutes to Deploy.

You may run into an error while deploying. Read the error message and do what it says. In this case the runtime version value defaulted to “2.2”. But Microsoft is only able to compile the 2.1 version. So go back to your app.json file and add that code. I’ll show that in the screen following the one below.

See the addition of the new line of code below. Realize that all the rest of this code was generated by Microsoft. Not to worry. You don’t need to type it.

When I tried to upload the new package, it failed again. This time because I needed to change the version number. So I made that change also in app.json. See below.


Finally after making the small changes to the app.json file, I re-created the package (.app) file. Then I was able to Upload and Deploy the new .app file.
See the results below. All design changes made in the Sandbox are now present in the Live Tenant.

Well I hope that hasn’t been too painful. You too should be able to do it now.
Thanks for reading all the way through.
----
Steve Simon
PDG Consultants, Inc.


For Indian traders exploring the global currency market, Forex Trading in India with WinProFX is an ideal solution. The platform provides a blend of low-cost spreads, rapid execution, and access to multiple trading strategies. Whether you’re new to Forex or an expert, WinProFX supports your journey with advanced tools, real-time insights, and secure transactions. Indian users can trade with confidence, knowing they have access to safe payment methods and round-the-clock assistance. With innovation, reliability, and transparency at its foundation, WinProFX makes Forex trading efficient and rewarding.
______________________________________________________________________________________________________
Address: 1st Floor, The Sotheby Building, Rodney Bay, Gros-Islet, Saint Lucia P.O Box 838, Castries, Saint Lucia.
_________________________________________________________________________________________________________
Phone: +971 4 447 1894
_________________________________________________________________________________________________________
Email: support@winprofx.com
What is Forex Trading Platform winprofx
A Forex Trading Platform like WinProFX is a digital gateway that allows traders to access the global foreign exchange market and execute currency trades in real time. WinProFX provides users with advanced tools such as live price charts, technical indicators, and automated trading features to help analyze market trends and make informed decisions. The platform is designed to be user-friendly, making it suitable for both beginners and professional traders. With secure transactions, fast trade execution, and risk management options, WinProFX stands out as a reliable platform that enables traders to maximize opportunities in the highly dynamic forex market.
Contact us Address – 1st Floor, The Sotheby Building, Rodney Bay, Gros-Islet, SAINT Lucia P.O Box 838,…
Funded Account Forex with Winprofx is transforming the way traders enter the forex market by offering a unique opportunity to trade with firm capital instead of risking personal funds. For both beginners and experienced traders, this model provides access to significant trading capital once the evaluation phase is cleared, allowing traders to focus on strategy and performance without the stress of financial risk. Winprofx stands out with its user-friendly platform, transparent rules, and flexible account scaling options designed to reward consistent profitability. Traders enjoy leverage benefits, tight spreads, and real-time execution, creating a professional trading environment that mirrors institutional standards. What makes a funded account particularly powerful is the ability to retain profits while safeguarding personal resources, which is why…